Installing a backer board is essential for a durable and water-resistant base under tile surfaces in spaces like bathrooms and kitchens. This guide breaks down the installation process into easy-to-follow steps, ensuring that even beginners can handle it with confidence. By preparing properly and following these steps, you can create a strong, stable foundation that will support your tilework for years to come, preventing moisture issues and structural problems down the line.

1. Understanding the Role of Backer Board
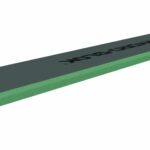
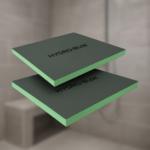
Backer board, often made from cement or fiber-reinforced materials, provides a solid base for tile installations, particularly in areas exposed to moisture. This material helps protect against water damage by creating a stable, non-flexible surface that holds up better under tiles than standard drywall or wood.
The use of backer board strengthens tile installations and extends their lifespan. By using backer board, you’re giving your tiles the support they need to stay in place, reducing the risk of cracks, mold, and other problems common in high-moisture environments like showers and kitchens.
2. Gather Your Tools and Materials
Before you start, make sure you have all the necessary tools and materials on hand. Basic tools include a utility knife, measuring tape, thin-set mortar, backer board screws, fiberglass mesh tape, and a notched trowel. Having everything ready helps streamline the process and keeps you focused on each step without interruptions.
Collecting your tools in advance can prevent mistakes and delays. Preparing ahead allows you to concentrate fully on getting each part of the installation right, ultimately making the whole job smoother and more precise.
3. Measure the Installation Area
Accurate measurements are the foundation of a successful backer board installation. Begin by measuring the length and width of the area where you’ll be laying the board. This ensures a snug fit and minimizes the need for adjustments once the board is in place.
Clearly marking your measurements helps avoid unnecessary gaps. By taking your time with this step, you’re setting yourself up for a cleaner and more efficient installation, saving both time and effort down the line.
4. Cut the Backer Board to Fit
Once you have your measurements, use a utility knife to score the backer board along those lines. For thicker backer board, you may need to score several times to achieve a clean cut. To snap the board, bend it along the scored line, applying firm pressure to make sure the break is precise.
5. Apply a Layer of Thin-Set Mortar
Thin-set mortar serves as an adhesive, helping the backer board bond with the subfloor. Spread a layer of mortar evenly across the area where the board will go, using a notched trowel to create grooves in the mortar. These grooves improve the mortar’s grip on the backer board.
A well-applied mortar layer provides a stable base for the board. By evenly spreading the mortar, you ensure full contact with the backer board, which helps prevent movement or shifting after installation.
6. Position the Backer Board on the Mortar
Carefully lay the cut backer board onto the mortar, pressing it firmly to ensure it bonds well. Take care to align each piece with the space you’ve measured, avoiding gaps between boards. Pressing down helps to settle the board into the mortar, creating a solid foundation for your tilework.
Aligning the board accurately prevents gaps and uneven spots. Ensuring the board sits flat and evenly spaced guarantees a stable surface for your tiles, reducing the risk of cracking or shifting over time.
7. Secure the Board with Backer Board Screws
After placing the board, secure it by driving in backer board screws along the edges and through the center of the board. Position screws about 6-8 inches apart to ensure a tight fit that will hold up over time.
Flush screws keep the surface smooth for tile application. Screwing the board in place strengthens the foundation, helping prevent movement or warping, which is crucial for long-lasting tile installations.
8. Tape and Seal the Joints
When installing multiple backer boards, there will be joints where two boards meet. To strengthen these joints, apply fiberglass mesh tape over each seam. This reinforces the seams and minimizes the risk of cracks forming between boards.
Using tape on joints ensures a stable, water-resistant base. Properly taping these areas adds durability and reduces the chance of tiles cracking at the seams, especially in high-moisture spaces.
9. Apply a Thin Layer of Mortar Over Joints
With the tape in place, apply a thin layer of mortar over each joint using a flat-edged trowel. This additional layer of mortar bonds the tape to the backer board and smooths out any slight gaps or uneven spots between boards.
Applying mortar over the joints adds extra stability to the base. A smooth, even surface at the joints prevents weak spots in your tilework and creates a unified foundation that’s ready for tile installation.
10. Allow the Mortar to Dry and Inspect the Surface
Before moving on, give the mortar adequate time to dry according to the manufacturer’s instructions. Once it’s dry, inspect the entire surface, ensuring all screws are flush, joints are sealed, and the board is secure.
Thorough inspection is essential for long-lasting results. Taking the time to check your work guarantees a smooth, stable surface that’s ready for tiling, ensuring your finished project will withstand the test of time.
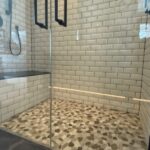
Build Your Dream Shower with Hydroblok
Following these steps ensures a solid, water-resistant base for your shower or tile project, giving you a sturdy, moisture-protected foundation that will support your tiles for years to come.
Hydroblok offers advanced shower systems that simplify the installation process and add a modern, sleek look to any bathroom. Their products are designed to withstand moisture, ensuring long-lasting, beautiful showers.
Ready to start your shower renovation?
Reach out to Hydroblok today to learn more about our innovative, easy-to-install shower systems—designed to save you time while providing top-notch durability. Contact us now to bring your modern, waterproof shower vision to life.
Comparte este artículo
Elija su plataforma: